Ursprünglicher Zweck war es emails vom privaten imap Server mobil, sicher und komfortabel über das iPhone Mail Programm abrufen zu können.
Weitere Dienste im privaten Netz können ebenfalls verwendet werden. Ausserdem kann über den Tunnel im Internet gesurft werden.
Um das zu erreichen wird über openswan eine ipsec Verbindung per Pre-Shared-Key authentifizierung aufgebaut. Über diese wird eine l2tp Verbindung getunnelt über die wiederum eine PPP Verbindung aufgebaut wird.
Ausgangspunkt für das beschriebene Setup waren diese Artikel auf www.jacco2.dds.nl und rootmanager.com.
Setup von openswan mit PSK
In der openswan Konfigurationsdatei /etc/ipsec.conf muss eine neue Verbindung definiert werden. Der Fett markierte Abschnitt erstellt eine Verbindung mit dem Namen "L2TP-PSK"
EDIT:
Nach dem Update auf squeezy mit der openswan Version U2.6.28/K2.6.26-2-686 funktionierte der Tunnel zunächst nicht mehr. Ein kleiner Eintrag in der ipsec.conf schafft Abhilfe:
Im Konfigurationsabschnitt
config setup
muss zusätzlich der Eintrag
protostack=netkey
gemacht werden.
/EDIT
# /etc/ipsec.conf - Openswan IPsec configuration file

version 2.0     # conforms to second version of ipsec.conf specification

# basic configuration
config setup
  # plutodebug / klipsdebug = "all", "none" or a combation from below:
  # "raw crypt parsing emitting control klips pfkey natt x509 private"
  # eg: plutodebug="control parsing"
  #
  # ONLY enable plutodebug=all or klipsdebug=all if you are a developer !!
  #
  # NAT-TRAVERSAL support, see README.NAT-Traversal
  nat_traversal=yes
  # virtual_private=%v4:10.0.0.0/8,%v4:192.168.0.0/16,%v4:172.16.0.0/12
  #
  # enable this if you see "failed to find any available worker"
  nhelpers=0

# Add connections here
conn L2TP-PSK
  authby=secret
  pfs=no
  rekey=no
  keyingtries=3
  left=%defaultroute
  leftprotoport=17/1701
  right=%any
  rightprotoport=17/%any
  rightsubnetwithin=0.0.0.0/0
  auto=add

# sample VPN connections, see /etc/ipsec.d/examples/


#Disable Opportunistic Encryption
include /etc/ipsec.d/examples/no_oe.conf
In der Datei /etc/ipsec.secrets werden die Pre Shared Keys für die ipsec Verbindung abgelegt. Da sich die Verbindung aber aufgrund des Dialup Netzwerks ständig ändert kann der Key in einer separaten Datei abgelegt werden. Dazu wird in der /etc/ipsec.secrets folgender Eintrag gemacht:
# RCSID $Id: ipsec.secrets.proto,v 1.3.6.1 2005-09-28 13:59:14 paul Exp $
# This file holds shared secrets or RSA private keys for inter-Pluto
# authentication.  See ipsec_pluto(8) manpage, and HTML documentation.

# RSA private key for this host, authenticating it to any other host
# which knows the public part.  Suitable public keys, for ipsec.conf, DNS,
# or configuration of other implementations, can be extracted conveniently
# with "ipsec showhostkey".
include ipsec.*.secrets
Damit bei einem ipsec Verbindungsaufbau der richtige Key zugeordnet werden kann werden neue Scripts in /etc/ppp/ip-up.d/ und /etc/ppp/ip-down.d/ angelegt. Dieses Script startet den ipsec Dienst neu wenn die Dsl Verbindung neu aufgebaut wird und legen den Pre Shared Key zu der aktuellen öffentlichen Adresse des Rechners an.
/etc/ppp/ip-up.d/ipsec
#!/bin/sh -e

# Die Variable CALL_FILE wird nur gesetzt, wenn der dsl link hoch/runter gefahren wird
[ "$CALL_FILE" ] || exit 0

echo "$IPLOCAL %any: PSK \"EinWirklichSicheresPasswort\"" > /etc/ipsec.current.secrets
/etc/init.d/ipsec start

exit 0
Achtung: Diese Datei sollte nur für den user root lesbar sein, da hier das Passwort für die Ipsec Verbindung abgelegt ist. Das gleiche gilt natürlich für die erzeugte Datei /etc/ipsec.current.secrets. Das Passwort EinWirklichSicheresPasswort muss natürlich durch ein wirklich sicheres Passwort ersetzt werden.
Ein Quick and Dirty Hack ist die Abfrage nach der Variable CALL_FILE um zu erkennen welcher ppp Daemon gestartet wird (Später werden weitere ppp Daemons für die VPN Verbindungen gestartet). Die Variable CALL_FILE wird vom pppd gesetzt wenn die Dsl Verbindung über eine interface Definition in /etc/network/interfaces und ein entsprechendes option File in /etc/ppp/peers/ (bei mir dsl-provider) gestartet wird.
Dagegen wird die Variable PEERNAME gesetzt wenn ein VPN Client eine Verbindung erfolgreich aufbaut. Dazu später mehr.
Falls es dafür eine bessere Lösung gibt würde ich mich über einen entsprechenden Kommentar freuen.
Der Gegenspieler im Ordner /etc/ppp/ip-down.d/ sieht so aus:
#!/bin/sh -e

# Die Variable CALL_FILE wird nur gesetzt, wenn der dsl link hoch/runter gefahren wird
[ "$CALL_FILE" ] || exit 0

/etc/init.d/ipsec stop

exit 0
Damit ist die Konfiguration von openswan abgeschlossen. Per /etc/init.d/ipsec restart kann der openswan Dienst neu gestartet werden. In /var/log/syslog sollten folgende Zeilen auftauchen:
ipsec_setup: ...Openswan IPsec stopped
ipsec_setup: Stopping Openswan IPsec...
[1277677.193925] NET: Registered protocol family 15
[1277677.525887] padlock: VIA PadLock Hash Engine not detected.
[1277677.826857] padlock: VIA PadLock Hash Engine not detected.
[1277678.259728] padlock: VIA PadLock not detected.
[1277678.448216] Initializing XFRM netlink socket ipsec_setup: NETKEY on ppp0 85.180.20.45/255.255.255.255 pointopoint 213.191.89.16
ipsec_setup: ...Openswan IPsec started
ipsec_setup: Starting Openswan IPsec 2.4.12...
In der /var/log/auth.log:
ipsec__plutorun: Starting Pluto subsystem...
ipsec__plutorun: Unknown default RSA hostkey scheme, not generating a default hostkey
pluto[10827]: Starting Pluto (Openswan Version 2.4.12 LDAP_V3 PLUTO_SENDS_VENDORID PLUTO_USES_KEYRR; Vendor ID OE`lPH|Vbpuu)
pluto[10827]: Setting NAT-Traversal port-4500 floating to on
pluto[10827]:    port floating activation criteria nat_t=1/port_fload=1
pluto[10827]:   including NAT-Traversal patch (Version 0.6c)
pluto[10827]: ike_alg_register_enc(): Activating OAKLEY_AES_CBC: Ok (ret=0)
pluto[10827]: no helpers will be started, all cryptographic operations will be done inline
pluto[10827]: Using NETKEY IPsec interface code on 2.6.26-2-686
pluto[10827]: Changing to directory '/etc/ipsec.d/cacerts'
pluto[10827]: Changing to directory '/etc/ipsec.d/aacerts'
pluto[10827]: Changing to directory '/etc/ipsec.d/ocspcerts'
pluto[10827]: Changing to directory '/etc/ipsec.d/crls'
pluto[10827]:   Warning: empty directory
pluto[10827]: loading secrets from "/etc/ipsec.secrets"
pluto[10827]: loading secrets from "/etc/ipsec.current.secrets"
pluto[10827]: added connection description "L2TP-PSK"
pluto[10827]: listening for IKE messages
pluto[10827]: adding interface ppp0/ppp0 85.180.20.45:500
pluto[10827]: adding interface ppp0/ppp0 85.180.20.45:4500
pluto[10827]: adding interface eth0/eth0 192.168.5.200:500
pluto[10827]: adding interface eth0/eth0 192.168.5.200:4500
pluto[10827]: adding interface lo/lo 127.0.0.1:500
pluto[10827]: adding interface lo/lo 127.0.0.1:4500
pluto[10827]: adding interface lo/lo ::1:500
pluto[10827]: forgetting secrets
pluto[10827]: loading secrets from "/etc/ipsec.secrets"
pluto[10827]: loading secrets from "/etc/ipsec.current.secrets"
Damit der Verbindungsaufbau wirklich funktionieren kann müssen noch die UDP Ports 500 und 4500 freigegeben werden. Dazu werden folgende Regeln eingetragen:
iptables -A INPUT -p udp --dport 500 -j ACCEPT
iptables -A INPUT -p udp --dport 4500 -j ACCEPT
Der aktuelle iptables Regelsatz kann mit
iptables-save > /etc/iptables.conf gespeichert werden.An dieser Stelle sollte bereits ein Verbindungsaufbau mit dem iPhone möglich sein. Dazu wird im iPhone die VPN Verbindung unter Einstellungen->Allgemein->Netzwerk->VPN eingerichtet.
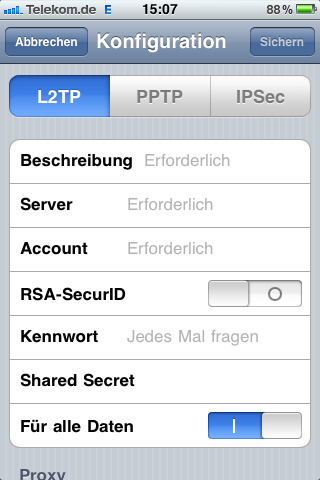 Unter Beschreibung kann ein beliebiger Text zur Identifikation der Verbindung eingetragen werden. Er hat keine Relevanz für die Konfiguration.
Als Server wird der Hostname des Servers eingetragen. Ich benutze einen DynDns.org Hostnamen der durch das Programm ddclient immer auf die aktuelle öffentliche IP meines privaten Servers zeigt.
Account ist der Username der später bei der PPP Authentifizierung Anwendung findet. Ich habe den Namen eines real auf dem System existierenden Users gewählt, bin mir aber nicht sicher ob das sein muss. Für dieses Tutorial nehmen wir an der User Name ist AccountName
Kennwort ist das Kennwort des Users wie in der /etc/ppp/chap-secrets beschrieben. In diesem Tutorial ist das Kennwort Kennwort
Shared Secret ist das Shared Secret welches in der /etc/ppp/ip-up.d/ipsec abgelegt ist. In diesem Fall "EinWirklichSicheresPasswort"
Für alle Daten sollte auf "1" stehen, wenn gewünscht wird, dass sämtlicher Traffic über das VPN getunnelt wird.
 Sind alle Daten korrekt eingetragen, kann ein erster Versuch gestartet werden. Das iPhone quittiert diesen Versuch mit der Meldung "Der L2TP-VPN-Server antwortet nicht. Versuchen Sie es erneut oder prüfen Sie ihre Einstellungen und wenden sich an den Administrator." Das ist zunächst nicht schlimm. Entscheidend ist, dass in der Datei /var/log/auth.log folgender Output erscheint:
pluto[10827]: packet from 80.187.99.65:44302: received Vendor ID payload [RFC 3947] method set to=109
pluto[10827]: packet from 80.187.99.65:44302: received Vendor ID payload [draft-ietf-ipsec-nat-t-ike] method set to=110
pluto[10827]: packet from 80.187.99.65:44302: ignoring unknown Vendor ID payload [xx]
pluto[10827]: packet from 80.187.99.65:44302: ignoring unknown Vendor ID payload [xx]
pluto[10827]: packet from 80.187.99.65:44302: ignoring unknown Vendor ID payload [xx]
pluto[10827]: packet from 80.187.99.65:44302: ignoring unknown Vendor ID payload [xx]
pluto[10827]: packet from 80.187.99.65:44302: ignoring unknown Vendor ID payload [xx]
pluto[10827]: packet from 80.187.99.65:44302: received Vendor ID payload [draft-ietf-ipsec-nat-t-ike-03] meth=108, but already using method 110
pluto[10827]: packet from 80.187.99.65:44302: received Vendor ID payload [draft-ietf-ipsec-nat-t-ike-02] meth=107, but already using method 110
pluto[10827]: packet from 80.187.99.65:44302: received Vendor ID payload [draft-ietf-ipsec-nat-t-ike-02_n] meth=106, but already using method 110
pluto[10827]: packet from 80.187.99.65:44302: received Vendor ID payload [Dead Peer Detection]
pluto[10827]: "L2TP-PSK"[3] 80.187.99.65 #5: responding to Main Mode from unknown peer 80.187.99.65
pluto[10827]: "L2TP-PSK"[3] 80.187.99.65 #5: transition from state STATE_MAIN_R0 to state STATE_MAIN_R1
pluto[10827]: "L2TP-PSK"[3] 80.187.99.65 #5: STATE_MAIN_R1: sent MR1, expecting MI2
pluto[10827]: "L2TP-PSK"[3] 80.187.99.65 #5: NAT-Traversal: Result using draft-ietf-ipsec-nat-t-ike (MacOS X): peer is NATed
pluto[10827]: "L2TP-PSK"[3] 80.187.99.65 #5: transition from state STATE_MAIN_R1 to state STATE_MAIN_R2
pluto[10827]: "L2TP-PSK"[3] 80.187.99.65 #5: STATE_MAIN_R2: sent MR2, expecting MI3
pluto[10827]: "L2TP-PSK"[3] 80.187.99.65 #5: ignoring informational payload, type IPSEC_INITIAL_CONTACT
pluto[10827]: "L2TP-PSK"[3] 80.187.99.65 #5: Main mode peer ID is ID_IPV4_ADDR: '10.201.6.181'
pluto[10827]: "L2TP-PSK"[3] 80.187.99.65 #5: I did not send a certificate because I do not have one.
pluto[10827]: "L2TP-PSK"[3] 80.187.99.65 #5: transition from state STATE_MAIN_R2 to state STATE_MAIN_R3
pluto[10827]: "L2TP-PSK"[3] 80.187.99.65 #5: STATE_MAIN_R3: sent MR3, ISAKMP SA established {auth=OAKLEY_PRESHARED_KEY cipher=aes_256 prf=oakley_sha group=modp1024}
pluto[10827]: "L2TP-PSK"[4] 80.187.99.65 #6: responding to Quick Mode {msgid:xx}
pluto[10827]: "L2TP-PSK"[4] 80.187.99.65 #6: transition from state STATE_QUICK_R0 to state STATE_QUICK_R1
pluto[10827]: "L2TP-PSK"[4] 80.187.99.65 #6: STATE_QUICK_R1: sent QR1, inbound IPsec SA installed, expecting QI2
pluto[10827]: "L2TP-PSK"[4] 80.187.99.65 #6: transition from state STATE_QUICK_R1 to state STATE_QUICK_R2
pluto[10827]: "L2TP-PSK"[4] 80.187.99.65 #6: STATE_QUICK_R2: IPsec SA established {ESP=>0x0 <0xf xfrm="AES_256-HMAC_SHA1" natd="80.187.99.65:44629" dpd="none}">
Konfiguration des xl2tpd
Die Konfiguration des xl2tpd erfolgt in der Datei /etc/xl2tpd/xl2tpd.conf
[global]                                                                ; Global parameters:
port = 1701                                                     ; * Bind to port 1701
ipsec saref = yes

[lns default]                                                   ; Our fallthrough LNS definition
ip range = 192.168.4.11-192.168.4.20    ; * Allocate from this IP range
local ip = 192.168.4.10                         ; * Our local IP to use
length bit = yes                                                ; * Use length bit in payload?
require chap = yes                                      ; * Require CHAP auth. by peer
refuse pap = yes                                                ; * Refuse PAP authentication
require authentication = yes                    ; * Require peer to authenticate
name = myServer                                            ; * Report this as our hostname
ppp debug = yes                                         ; * Turn on PPP debugging
pppoptfile = /etc/ppp/options.l2tpd     ; * ppp options file
Wichtig sind hier die Einträge "local ip", "ip range" und "pppoptfile".
Die verwendeten IPs sollten nicht im privaten Subnetz liegen. In diesem Beispiel ist das private Subnetz 192.168.5.0/24, die Ip Adressen, die für das VPN verwendet werden liegen im Subnetz 192.168.4.0/24.
Der Parameter "local ip" gibt an welche Adresse der Server im VPN bekommt. Der Parameter "ip range" gibt an welche Adressen für die VPN Clients zur Verfügung stehen. pppoptfile gibt an wo das ppp options file zu finden ist welches die PPP Verbindungen konfiguriert.
Achtung: require authentication gibt an, dass sich die Clients beim PPP Verbindungsaufbau authentifizieren müssen und hat nichts mit der l2tp authentifizierung zu tun. Diese muss abgeschaltet bleiben. Dafür darf der Parameter auth file im Abschnitt global auf keinen Fall gesetzt werden.
Konfiguration der PPP Verbindung
Die PPP Verbindung wird in der Datei /etc/ppp/options.l2tpd Konfiguriert. Die Konfiguration sieht wie folgt aus:
ipcp-accept-local
ipcp-accept-remote
noccp
ms-dns 192.168.5.200
auth
name l2tpd
crtscts
idle 1800
mtu 1400
mru 1400
nodefaultroute
debug
lock
connect-delay 5000
Der Wert des Parameters ms-dns muss auf die lokalen Gegebenheiten angepasst werden. In meinem Fall hat der lokale DNS Server die Adresse 192.168.5.200. Ich verwende das Programm dnsmasq um das lokale Subnetz mit einer Kombination aus DNS und lokaler Namensauflösung zu versorgen.
Damit sich das iPhone als VPN Client beim pppd authentifizieren kann müssen noch die Parameter "Account" und "Kennwort" aus dem iPhone Setup in die Datei /etc/ppp/chap-secrets übertragen werden. Dazu wird in der /etc/ppp/chap-secrets folgender Eintrag vorgenommen:
AccountName l2tpd "Kennwort" *
Alternativ kann dem Client eine feste IP Adresse zugeordnet werden. Dazu muss der Eintrag modifiziert werden:
AccountName l2tpd "Kennwort" 192.168.4.11
In beiden Fällen müssen die Parameter AccountName und Kennwort ersetzt werden. Der Parameter l2tpd bleibt erhalten da er die Verbindung zum Verbindungs-Namen aus der Datei /etc/ppp/options.l2tpd herstellt.
Damit der Verbindungsaufbau zum l2tpd Server klappt muss in den iptables noch folgende Regel eintragen werden:
iptables -A INPUT -p udp -m policy --dir in --pol ipsec --dport 1701 -j ACCEPT
Diese Regel sorgt dafür, dass Pakete die in IPSEC Paketen transportiert werden an den lokalen Port 1701 weitergeleitet werden dürfen. Dieser Port sollte auf jeden Fall auf dem öffentlichen Interface geblockt sein, da sonst nicht gewährleistet ist, dass die Verbindung verschlüsselt statt findet.
Damit die VPN Clients Verkehr in das lokale Netz weiterleiten dürfen und auch Services auf dem Server ansprechen dürfen müssen beim Verbindungsaufbau noch Regeln in die Firewall eingetragen werden. Ausserdem bedarf es noch einer Regel, die per Connection-Tracking zugehörigen Verkehr aus dem öffentlichen Netzwerk zurück an den VPN Client routet. Das geschieht in meinem Setup mit zwei weiteren Scripts:
/etc/ppp/ip-up.d/vpn-iptables
#!/bin/sh -e

# Die Variable PEERNAME wird nur gesetzt wenn eine Verbindung von aussen initiert wird.
[ "$PEERNAME" ] || exit 0

iptables -A INPUT -i $PPP_IFACE -j ACCEPT
iptables -A FORWARD -i $PPP_IFACE -j ACCEPT
iptables -A FORWARD -i ppp0 -o $PPP_IFACE -m conntrack --ctstate RELATED,ESTABLISHED -j ACCEPT

exit 0
/etc/ppp/ip-down.d/vpn-iptables
#!/bin/sh -e

# Die Variable PEERNAME wird nur gesetzt wenn eine Verbindung von aussen initiert wird.
[ "$PEERNAME" ] || exit 0

iptables -D INPUT -i $PPP_IFACE -j ACCEPT
iptables -D FORWARD -i $PPP_IFACE -j ACCEPT
iptables -D FORWARD -i ppp0 -o $PPP_IFACE -m conntrack --ctstate RELATED,ESTABLISHED -j ACCEPT

exit 0
Damit die Clients im Internet surfen können bedarf es noch folgender Regel um den Verkehr zu NATen:
iptables -t nat -A POSTROUTING -s 192.168.4.0/24 -o ppp0 -j MASQUERADE
ppp0 ist dabei das Dsl Interface
Modifikation des Skripts /etc/ppp/ip-down.d/0000usepeerdns
Damit nach einem erfolgreichen Verbindungsauf- und Abbau durch einen VPN Client der DNS im lokalen Netz noch korrekt funktioniert musste ich auf meinem System das Script /etc/ppp/ip-down.d/0000usepeerdns anpassen:
#!/bin/sh -e

# this variable is only set if the usepeerdns pppd option is being used
[ "$USEPEERDNS" ] || exit 0

# exit if the resolvconf package is installed
[ -x /sbin/resolvconf ] && exit 0

# follow any symlink to find the real file
if [ -e /etc/resolv.conf ]; then
REALRESOLVCONF=$(readlink --canonicalize /etc/resolv.conf)
else
REALRESOLVCONF=/etc/resolv.conf
fi

# if an old resolv.conf file exists, restore it
if [ -e $REALRESOLVCONF.pppd-backup ]; then
mv -f $REALRESOLVCONF.pppd-backup $REALRESOLVCONF

# restart nscd because resolv.conf has changed
if [ -e /var/run/nscd.pid ]; then
  /etc/init.d/nscd restart || true
fi
fi

exit 0
Test der Verbindung
Wird über das iPhone jetzt eine Verbindung aufgebaut sollte zusätzlich zu den bisherigen Log-Einträgen folgendes in der /var/log/syslog zu sehen sein:
xl2tpd[14657]: control_finish: Peer requested tunnel 75 twice, ignoring second one.
xl2tpd[14657]: Connection established to 80.187.98.65, 60526.  Local: 19527, Remote: 75 (ref=0/0).  LNS session is 'default'
xl2tpd[14657]: start_pppd: I'm running:
xl2tpd[14657]: "/usr/sbin/pppd"
xl2tpd[14657]: "passive"
xl2tpd[14657]: "-detach"
xl2tpd[14657]: "192.168.4.10:192.168.4.11"
xl2tpd[14657]: "refuse-pap"
xl2tpd[14657]: "auth"
xl2tpd[14657]: "require-chap"
xl2tpd[14657]: "name"
xl2tpd[14657]: "myServer"
xl2tpd[14657]: "debug"
xl2tpd[14657]: "file"
xl2tpd[14657]: "/etc/ppp/options.l2tpd"
xl2tpd[14657]: "/dev/pts/5"
xl2tpd[14657]: Call established with 80.187.98.65, Local: 7906, Remote: 1062, Serial: 1
pppd[20016]: pppd 2.4.4 started by root, uid 0
pppd[20016]: using channel 94
pppd[20016]: Using interface ppp1
pppd[20016]: Connect: ppp1 <--> /dev/pts/5
pppd[20016]: sent [LCP ConfReq id=0x1      ]
pppd[20016]: rcvd [LCP ConfReq id=0x1    ]
pppd[20016]: sent [LCP ConfAck id=0x1    ]
pppd[20016]: rcvd [LCP ConfAck id=0x1      ]
pppd[20016]: sent [LCP EchoReq id=0x0 magic=0x1ax]
pppd[20016]: sent [CHAP Challenge id=0x76 <9x>, name = "l2tpd"]
pppd[20016]: rcvd [LCP EchoReq id=0x0 magic=0x3dc2de0a]
pppd[20016]: sent [LCP EchoRep id=0x0 magic=0x1ad0e4e9]
pppd[20016]: rcvd [LCP EchoRep id=0x0 magic=0x3dc2de0a]
pppd[20016]: rcvd [CHAP Response id=0x76 <6x>, name = "michael"]
pppd[20016]: sent [CHAP Success id=0x76 "Access granted"]
pppd[20016]: sent [IPCP ConfReq id=0x1  ]
pppd[20016]: rcvd [IPCP ConfReq id=0x1   ]
pppd[20016]: sent [IPCP ConfNak id=0x1   ]
pppd[20016]: rcvd [IPV6CP ConfReq id=0x1 ]
pppd[20016]: Unsupported protocol 'IPv6 Control Protovol' (0x8057) received
pppd[20016]: sent [LCP ProtRej id=0x2 80 57 01 01 00 0e 01 0a cd e4 2b 3a 8c d5 10 24]
pppd[20016]: rcvd [IPCP ConfRej id=0x1 ]
pppd[20016]: sent [IPCP ConfReq id=0x2 ]
pppd[20016]: rcvd [IPCP ConfReq id=0x2   ]
pppd[20016]: sent [IPCP ConfAck id=0x2   ]
pppd[20016]: rcvd [IPCP ConfAck id=0x2 ]
pppd[20016]: Cannot determine ethernet address for proxy ARP
pppd[20016]: local  IP address 192.168.4.10
pppd[20016]: remote IP address 192.168.4.11
pppd[20016]: Script /etc/ppp/ip-up started (pid 20020)
pppd[20016]: Script /etc/ppp/ip-up finished (pid 20020), status = 0x0
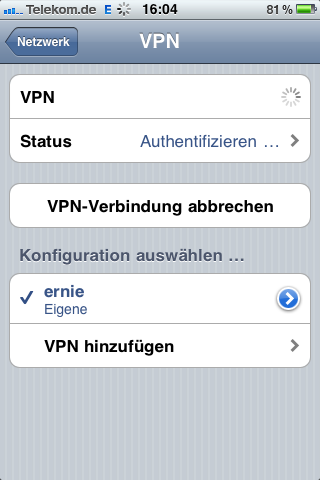
Auf dem iPhone sieht der Aufbau der Verbindung folgendermassen aus:


Viel Spaß mit dem VPN!
Über Kritik, Anregungen und Kommentare freue ich mich!